


This was our last meeting of the year except our Christmas meal which will be on the 13Th of this month at the Brent house.
We will have about 30 attending so it should be a good night.We need to be there for about 7 O clock to sit down for about 7 30.
A polite reminder we have to pay our membership fee to the AWGB by the end of the year therefore all membership moneys need to be in by the end of December latest.
I will be doing demonstrations at several clubs next year so I used our members as Guinea pigs to try out a demo turning a large candlestick.
Sue Meads our Secretary has kindly done a write up of the process to help you if you need a reminder when you make one.
Thank you sue.
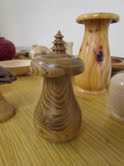
The last meeting before Christmas drew most members to watch George demonstrating his 3 piece pine candlestick that he will demonstrate to several clubs in the New Year.
He explained that ideally you need to make a template. To make the initial board draw the sizes on some MDF.
He makes templates out of MDF so that they can be saved for another day and hung in the workshop.
All the sizes are marked and one side is cut to shape to give a visual aid and all sizes are to hand. Dimensions have to be accurate as they will be transferred onto the wood. The cut out is just a reminder of the form you are creating.
George used a 4" square of pine and rounded down to an even thickness with a spindle roughing gouge. Next the sizing and reference marks are transferred from your template to the roughed out cylinder.
A Mark Sanger tip is to create an indent for the pencil to sit in on your template - it makes marking easier.
With reference points marked he was ready to turn them down to size. George held the parting tool in one hand and callipers in the other to check the size. He turned the wood down for the spigot and then the adjacent cove. The cove was created between the two lines leaving a shoulder both sides. The pencil line marking the centre of the ball helps get a balanced ball. George worked both ways either side of the line to make sure the biggest possible diameter was left. All the time George had the template positioned behind the piece he was turning.
He then turned the flowing Baluster shape that made the body of the candlestick. He continually checked the shape with the callipers. When he was happy it was gently sanded.
He then started on the top and bottom.
The two pieces are cut from 6" x 3" pine and rounded. George would ideally then mount the pieces on a screw chuck while roughing out.
He put two marks on the blank one for the mortise and the other to show where the shoulder will start.
He used dividers and made sure that only the left hand point touches. George advised that when turning cross grain pine use as high a speed that is safe and take small cuts as big shards /splinters can break off if you take big cuts.
He then made a recess with a thin parting tool to fit the jaws. This will serve as the recess for work holding then it will be used on the finished piece for setting the candle in. On the base it would not show as it will be on the underside. The pieces are sanded.
A correct fit has to be achieved as you have to allow a bit for glue expansion. Both the bottom and top are now ready to be fitted with the use of a hot glue gun.
After assembly there was further sanding and colouring with spirit stains to create the desired finish.


Myself and your committee would like to take this opportunity to wish you all A happy and prosperous new year.
No comments:
Post a Comment